


 United States


 Best Seller
 All Printers
 All PDAs
 All Tablets
 All Thermal Labels
 Printer Accessories
Whether you're running a business or just need to send out a few packages to friends and family, learning how to create shipping labels and print them at home is a total game-changer. It saves time, money, and—let’s be honest—your sanity. There are no more last-minute dashes to the post office or struggling to scribble addresses legibly on packages. With the right tools and a few simple steps, you’ll be printing professional-looking shipping labels like a pro in no time.
So grab your favorite cup of coffee or tea, and let’s dive into the world of at-home shipping label printing! We’ll cover everything from creating shipping labels to printing them with your trusty thermal printer. Ready? Let’s go
Why Print Shipping Labels at Home?
Before we get into the nitty-gritty, let’s talk about why printing shipping labels at home is such a smart move:
Convenience: No more waiting in the long lines at the post office. You can print labels at any time, anywhere.
Professional Appearance: Clean and polished printed labels are essential for business owners looking to make a lasting impression on their customers.
Cost Savings: Printing shipping labels at home is not only convenient but also more cost-effective compared to purchasing them at the post office. Plus, thermal printers don’t require ink, so you save even more in the long run.
Time Efficiency: Streamline your shipping process by printing labels in bulk, perfect for busy entrepreneurs.
Now, let’s move on to the fun stuff: designing and printing your shipping labels.
What to Consider When Designing Shipping Labels
Before you can print, you need to create a shipping label. Don’t worry—it’s easier than it sounds! Here are some key factors to keep in mind:
1. Label Size Matters
Shipping labels come in various sizes, so you’ll need to pick the right one for your needs. The most common size is 4” x 6”, which works perfectly with most shipping carriers like USPS, UPS, and FedEx. If you’re using a thermal printer, ensure the printer supports the label size you pick.
2. Include All the Essentials
When you create a shipping label, make sure it contains:
- The recipient’s name and address
- Your return address
- The shipping carrier’s barcode
- Tracking information
- Any special instructions (e.g., “Fragile” or “Handle with Care”)
Most shipping platforms, like Shopify, Etsy, or PayPal, will automatically generate these details for you when you purchase a shipping label. Easy peasy!
3. Don’t Overcrowd Your Label
Keep it clean and readable. Avoid adding unnecessary text or images that might confuse the barcode scanners used by shipping carriers.
4. Brand It Up
If you’re a business owner, consider adding your logo or brand colors to your label. It’s a subtle way to reinforce your branding and make your package stand out. Just ensure it doesn’t interfere with the essential shipping information.
What Tools You’ll Need to Print Shipping Labels at Home

Now that you’ve got your label design ready, let’s talk about the tools you’ll need to bring it to life. Here’s your ultimate checklist:
1. A Reliable Thermal Printer
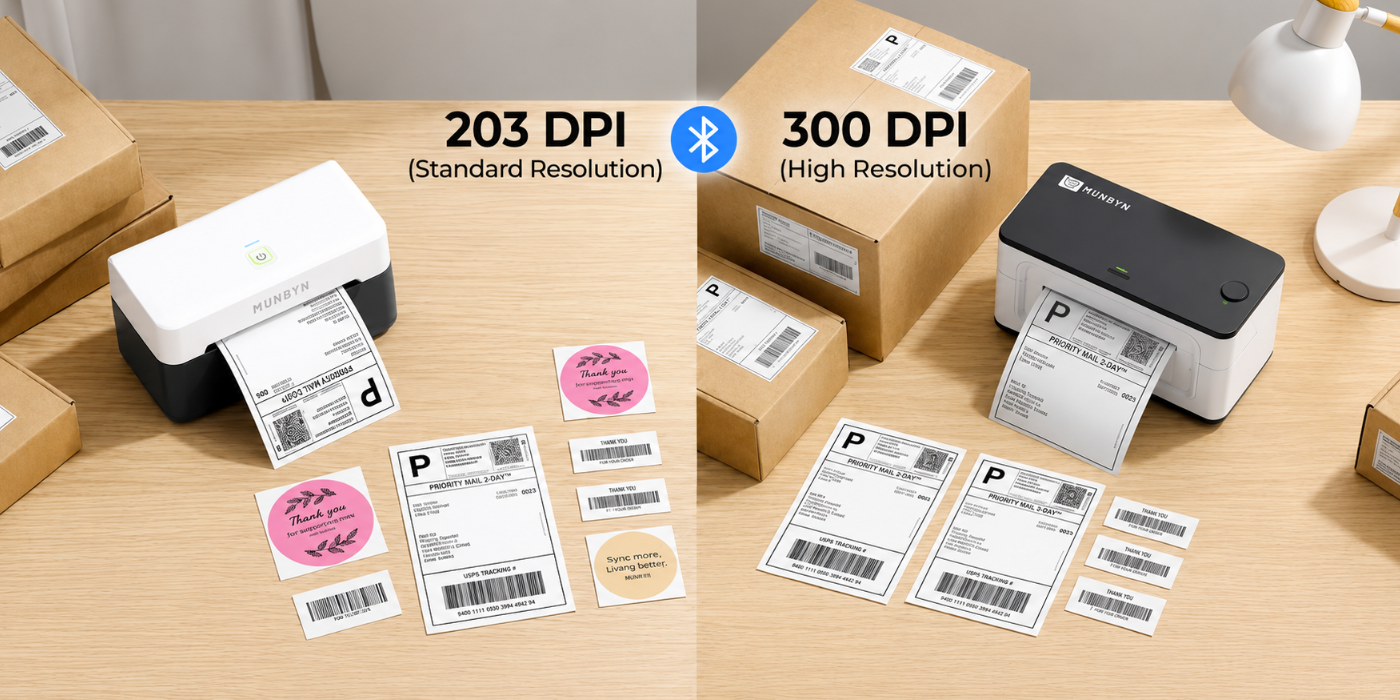
Thermal printers are the MVPs of at-home shipping. Why? Because they don’t use ink or toner—just heat! This makes them super cost-effective and low-maintenance. If you are looking for a reliable thermal printer, our MUNBYN thermal printers are the perfect choice for home use.
2. Thermal Shipping Labels
You’ll need high-quality thermal labels that are compatible with your printer. Our MUNBYN thermal labels are durable, waterproof, and smudge-proof, which makes them stay intact even in tough shipping conditions.
3. A Computer or Smartphone
You’ll use this to create shipping labels or download them. Most shipping platforms are user-friendly and work seamlessly on both computers and mobile devices.
4. Shipping Software or Platform
If you’re selling products online, platforms like Shopify, Etsy, and eBay make it easy to create shipping labels. You can also choose services like Pirate Ship or ShipStation for discounted shipping rates.
How to Print Shipping Labels at Home
Ready to get started? Follow these simple steps to create shipping labels and print them at home:
Step 1: Purchase Your Shipping Label
Log in to your preferred shipping platform or software. Enter the recipient’s address, package weight, and dimensions. Select your shipping carrier and service level (e.g., standard, express). Once you’ve paid for the label, the platform will automatically create a shipping label for you. You can then download it as a PDF.
Step 2: Load Your Thermal Printer
Unbox your thermal printer (if you haven’t already) and connect it to your computer or smartphone. Load your thermal shipping labels into the printer. Ensure the labels are aligned correctly to avoid misprints.
Step 3: Adjust Printer Settings
Open the downloaded PDF of your shipping label. Adjust your printer settings to match the label size (e.g., 4” x 6”). Double-check that the “fit to page” option is turned off to avoid resizing issues.
Step 4: Print Your Label
Hit that print button and watch the magic happen! Your thermal printer will produce a crisp, professional-looking label in seconds.
Step 5: Attach the Label to Your Package
Peel off the backing of your thermal label and stick it securely to your package. Ensure the barcode is flat, unobstructed, and easy for the shipping carrier to scan.
How to Make Flawless Shipping Labels

Here are some pro tips to ensure your shipping labels always look their best:
Test Print First: If you’re using a new printer or label size, test printing on regular paper to make sure everything aligns correctly.
Store Labels Properly: Keep your thermal labels in a cool, dry place to prevent them from curling or losing their adhesive.
Double-Check Addresses: Typos happen! Always double-check the recipient’s address before printing your label.
Use Clear Packaging Tape (If Needed): If you’re not using adhesive labels, print your label on regular paper and secure it to the package with clear tape. Just make sure the tape doesn’t cover the barcode.
Conclusion
And there you have it—a complete guide to printing shipping labels at home! With the right tools and a little know-how, you’ll be shipping packages like a total boss in no time. Whether you’re running a business or just love the convenience of at-home printing, MUNBYN has everything you need to make the process smooth, efficient, and fun.
Ready to upgrade your shipping game? We have a surprise for you! If you purchase our products now and use the limited-time discount code MY06, you can enjoy an extra 6% off your shopping!
FAQs
1. Can I use a regular printer to print shipping labels instead of a thermal printer?
Yes, you can! If you don’t have a thermal printer, you can use a regular inkjet or laser printer to print shipping labels on plain paper. However, keep in mind that you’ll need to cut out the label and attach it to your package using clear packaging tape. This method works in a pinch, but it’s less efficient and more time-consuming compared to using a thermal printer. Plus, thermal printers save you money on ink and toner in the long run—so it’s a win-win!
2. What should I do if my shipping label prints out blurry or misaligned?
Blurry or misaligned labels can be caused by a few issues, but don’t worry—here’s how to fix them:
Check your printer settings: Make sure the label size in your printer settings matches the size of the label you’re using (e.g., 4” x 6”).
Use high-quality labels: Low-quality labels can cause smudging or poor print quality. Switch to durable, smudge-proof labels like our MUNBYN thermal labels for better results.
Clean your printer: Dust or residue on the printer head can affect print quality. Follow your printer’s cleaning instructions to keep it in tip-top shape.
If the issue persists, feel free to reach out to our friendly MUNBYN support team—we’re here to help!
3. Are thermal shipping labels waterproof and durable?
Absolutely! Thermal labels are designed to be waterproof, smudge-proof, and resistant to wear and tear. This means your labels will stay intact even if they’re exposed to rain, humidity, or rough handling during transit. Just make sure you store your labels properly (in a cool, dry place) to maintain their adhesive strength.

Share:
How to Make Custom Wine Labels | Wow Your Guests and Customers
How Can Android Handheld Scanners Enhance Power Grid Data Accuracy?